


GPS solar-powered ground-buried stud SRD-619
Cast Aluminum Recessed Solar Road Stud Model: SRD-619 Specifications: D123*H48mm Material: Die-cast aluminum housing + imported transparent PC Brief Introduction: After installation, it can withstand vehicle pressure, static pressure resistance is about 55 tons, parallel to the ground, can be used for road center lines or pedestrian crosswalks, etc. Solar powered, no need to lay ground wires, the inner core can be quickly replaced during maintenance.
Keywords:
SROADA
The SRD-619 embedded solar road stud light utilizes the photovoltaic effect of solar energy to convert solar energy into electricity. The control system then stores this electricity in a battery. At night and in rainy or foggy weather with insufficient sunlight, it automatically illuminates, effectively guiding vehicles in the correct direction and ensuring traffic safety, while also providing landscape lighting.
 Advantages and Features:
Energy-saving: Utilizing solar energy conversion to electricity, combined with high-efficiency LED light sources, achieves energy saving.
Environmentally friendly: No pollution, no radiation, no greenhouse gas emissions, achieving energy saving and carbon reduction.
Safe: Low voltage, no electric shock or fire accidents.
Convenient: Easy installation, no wiring or underground construction required.
Low investment: One-time investment, long-term benefits.
Application scenarios: Can be used in the middle of highways, withstanding pressure up to 35 tons
1. Road curbs on four-lane roads or more, but without a central divider and insufficient nighttime lighting;
2. Intersections/crosswalks (speed reduction prompt);
3. Sharp turns;
4. Foggy areas (seaside, airport roads);
5. Road curbs on highways and roads without streetlights;
6. Guide lines at the entrances and exits of overpasses and tunnels;
7. Road islands, vehicle diversion areas (perimeter of triangular areas);
8. Railway ramps;
9. On toll booth lanes;
10. Accident-prone areas;
11. City sidewalks, park paths, and other areas requiring landscape lighting.
Product Parameters |
1. Power supply: Solar panel (monocrystalline silicon): Maximum power 0.45W
2. Energy storage device: Lithium iron phosphate battery 3.2V 1000mAh
3. Working time: Under standard light intensity, charging for one day allows continuous operation for about 24 hours, and a full charge allows operation for about 90 hours
4. Display mode: Flashing or constant light selectable.
5. Display color: White, yellow, red, green, and blue are selectable.
6. Display device: Ultra-bright LED 6PCS
7. Visible distance: >500 meters
8. Service life: 5-7 years for lithium iron phosphate battery type
9. Operating environment: -25℃~+70℃
10. Housing material: Die-cast aluminum + polycarbonate
11. Dimensions: Diameter 123*H48mm, hole size 127MM, weight 0.78KG
12. Compressive strength: Static compressive strength approximately 55 tons, waterproof rating: IP68
13. Packaging size: 41*28*24CM, 24PCS/carton
Product Specification Diagram |

Installation Method |
1. Set up safety warning facilities.
2. Drill a 127mm diameter hole, approximately 45mm deep, using a drill.(Mark the drill or add a ring to the drill bit to ensure the drilled hole has a certain depth)
3. Remove the asphalt in the center of the hole using a socket wrench.(If it is a cement road surface, use an electric breaker to break up the cement)
4. Blow away sand, soil, and water in the hole using high-pressure air.(Or use a sponge to dry the water. The water must be completely dry, otherwise it will not adhere properly)
5. Use a mold of fixed height to test whether the depth of the hole is appropriate.(Otherwise, it needs to be adjusted)
6. Place asphalt glue or epoxy resin into the hole, add an appropriate amount of small stones and make it flat.(Asphalt glue hardens quickly, construction is fast, less impact on traffic, and low cost, suitable for highways, high traffic volume or a large number of continuous installations. For smaller, sporadic projects, use epoxy resin)
7. Place the solar road stud light into the hole, rotate the LED beads to align with the oncoming traffic, and finally gently tap the top of the stud with a rubber hammer to make it flat and completely secure.
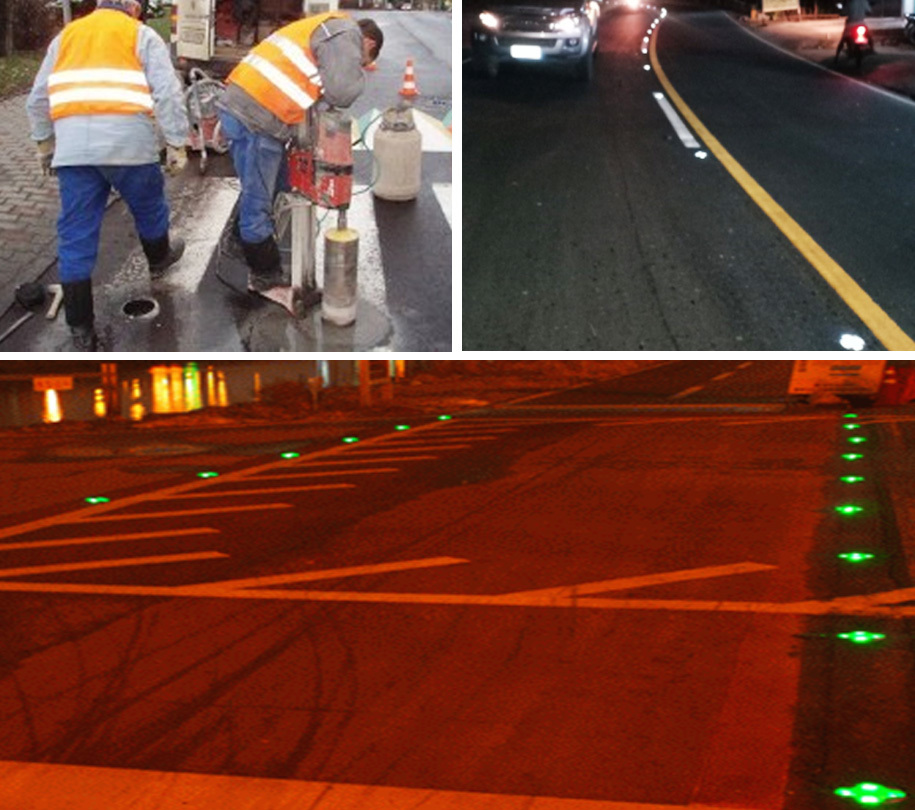
Product Installation Diagram |
SRD-312 Solar Landscape Light Installation Case
SRD-312 Solar Landscape Light Installation Case
SRD-305 Installation Case Study in Duyun City, Guizhou Province
SRD801 warning light installation case
SRD-305 Installation Case Study in Duyun City, Guizhou Province
SRD-306 lamp installation case in Singapore
Product Center
PRODUCTS CENTER
Recommended
Information
Contact Us
Company Address: Building D, 4F, Gem Science and Technology Park, Gemstone Road, Shiyan Street, Bao'an District, Shenzhen
The SRD-619 embedded solar road stud light utilizes the photovoltaic effect of solar energy to convert solar energy into electricity. The control system then stores this electricity in a battery. At night and in rainy or foggy weather with insufficient sunlight, it automatically illuminates, effectively guiding vehicles in the correct direction and ensuring traffic safety, while also providing landscape lighting.
Advantages and Features:
Energy-saving: Utilizing solar energy conversion to electricity, combined with high-efficiency LED light sources, achieves energy saving.
Environmentally friendly: No pollution, no radiation, no greenhouse gas emissions, achieving energy saving and carbon reduction.
Safe: Low voltage, no electric shock or fire accidents.
Convenient: Easy installation, no wiring or underground construction required.
Low investment: One-time investment, long-term benefits.
Application scenarios: Can be used in the middle of highways, withstanding pressure up to 35 tons
1. Road curbs on four-lane roads or more, but without a central divider and insufficient nighttime lighting;
2. Intersections/crosswalks (speed reduction prompt);
3. Sharp turns;
4. Foggy areas (seaside, airport roads);
5. Road curbs on highways and roads without streetlights;
6. Guide lines at the entrances and exits of overpasses and tunnels;
7. Road islands, vehicle diversion areas (perimeter of triangular areas);
8. Railway ramps;
9. On toll booth lanes;
10. Accident-prone areas;
11. City sidewalks, park paths, and other areas requiring landscape lighting.
Product Parameters |
1. Power supply: Solar panel (monocrystalline silicon): Maximum power 0.45W
2. Energy storage device: Lithium iron phosphate battery 3.2V 1000mAh
3. Working time: Under standard light intensity, charging for one day allows continuous operation for about 24 hours, and a full charge allows operation for about 90 hours
4. Display mode: Flashing or constant light selectable.
5. Display color: White, yellow, red, green, and blue are selectable.
6. Display device: Ultra-bright LED 6PCS
7. Visible distance: >500 meters
8. Service life: 5-7 years for lithium iron phosphate battery type
9. Operating environment: -25℃~+70℃
10. Housing material: Die-cast aluminum + polycarbonate
11. Dimensions: Diameter 123*H48mm, hole size 127MM, weight 0.78KG
12. Compressive strength: Static compressive strength approximately 55 tons, waterproof rating: IP68
13. Packaging size: 41*28*24CM, 24PCS/carton
Product Specification Diagram |
Installation Method |
1. Set up safety warning facilities.
2. Drill a 127mm diameter hole, approximately 45mm deep, using a drill.(Mark the drill or add a ring to the drill bit to ensure the drilled hole has a certain depth)
3. Remove the asphalt in the center of the hole using a socket wrench.(If it is a cement road surface, use an electric breaker to break up the cement)
4. Blow away sand, soil, and water in the hole using high-pressure air.(Or use a sponge to dry the water. The water must be completely dry, otherwise it will not adhere properly)
5. Use a mold of fixed height to test whether the depth of the hole is appropriate.(Otherwise, it needs to be adjusted)
6. Place asphalt glue or epoxy resin into the hole, add an appropriate amount of small stones and make it flat.(Asphalt glue hardens quickly, construction is fast, less impact on traffic, and low cost, suitable for highways, high traffic volume or a large number of continuous installations. For smaller, sporadic projects, use epoxy resin)
7. Place the solar road stud light into the hole, rotate the LED beads to align with the oncoming traffic, and finally gently tap the top of the stud with a rubber hammer to make it flat and completely secure.
Product Installation Diagram |
SRD-312 Solar Landscape Light Installation Case
SRD-312 Solar Landscape Light Installation Case
SRD-305 Installation Case Study in Duyun City, Guizhou Province
SRD801 warning light installation case
SRD-305 Installation Case Study in Duyun City, Guizhou Province
SRD-306 lamp installation case in Singapore
Leave a Message
If you are interested in our products and want to learn more, please leave a message here, and we will reply to you as soon as possible.
Company Address: Building D, 4F, Gem Science and Technology Park, Gemstone Road, Shiyan Street, Bao'an District, Shenzhen
Cooperation Consultation:

Mr. Zhong

Mr. Zhong
WhatsApp:8613530665818
Skype:Support@sroada.com
Mr. Zhong:+86 13530665818
Mr. Zhong:+86 18675508970
Business1:Sales01@sroada.com
Business 2:Sales02@sroada.com
Support:Support@sroada.com
QQ:691351563